Pages

Saturday, September 24, 2011

Car Seat Cover

I don't have a tutorial for how I did this car seat cover. I used so many great other tutorials from other blogs that I didn't think I needed to!

For the whole cover I used this tutorial
I did do a few things different. She free handed her corners but I used a large charger plate to trace the rounded corners because it is big and flat. MAKE SURE that you prewash all your fabric. I also added large ric rac around the edges.

I used this Fabric

For the handles I used this tutorial because I loved the width.
On the backside I made a little pocket using another tutorial but I can't remember where!. I also made a matching nursing cover strap that is inside the pocket...just in case I may need it!

For the reverse side I used this fabric

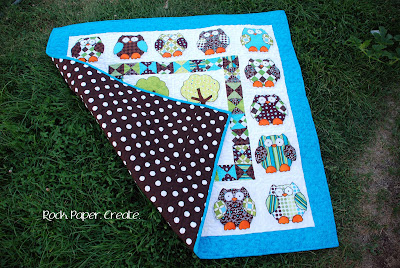
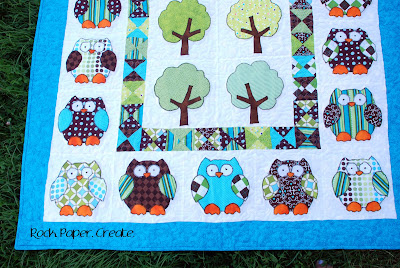
Owl Quilt Completed!

I am now 38.5 weeks pregnant! What better time to start a craft blog- I will be off for 12 weeks once my little guy comes! I'm excited for my little baby boy to arrive but I'm also so happy that I've finally finished his quilt! This was kind of a pain but here is the finished product! All fabric is from Hobby Lobby and Joann's.
I didn't follow the directions for the appliques. I actually found this AMAZING temporary basting glue that dries clear and is water soluable. So basically it's only there until you wash your fabric!
I used the glue and glued all pieces on the block before I sewed them. By the way I was worried I would need more than one bottle but I barely used HALF on the entire quilt. I'm considering using this for all my appliques from now on- even on onesies.


Get Well Soon Survival Kit Tutorial w/FREE Printables

Welcome to my very first blog post and tutorial! Today I'm sharing a tutorial on how to make a "Get Well Soon Surivial Kit". This can be used for ANY type of kit that you would like. My Mom (She's amazing check out more about her here) has Multiple Sclerosis and is getting surgery this week on her shoulder that she injured from falling down. She is going to stay at a rehibilitation center that provides 24/7 physical therapy and care for the week. I thought this would be a perfect time to make her a "Get Well Soon Survival Kit" to take with her...

Supplies:
  • Box with lid or other container
  • Mod Podge
  • Paper (I used 5.5 12x12 sheets)
  • Foam Brush
  • Paper Cutter
  • Survival Items (candy, pens, paper, etc.)
I got this white box at Michael's for $2.79 but used a 40% off coupon.
Next, I cut the paper to fit the sides and Mod Podged them on.
Here are a few things I got to go inside. I found these in the Michael's $ section. I'm also going to put some nice sock slippers, chapstick and her favorite candy inside.
I then printed the following label on paper and used my Silhouette to cut out the shape and Mod Podge it on.

Here are some labels I made that you can download, print and cut out for your box.
From

If you are going to use a Silhouette to cut out the shape you can download and use the following file to do so.
Survival Kit Tags PDF


I hope you enjoyed my first tutorial. If you have any questions please feel free to contact me!

Chelsey